Manually Adding a Reviewer to a Campaign
Sometimes you have a close friend, a family member, or a top-tier influencer who you want on your team without making them fill out an application form. RS ARC Manager allows you to bypass the application process and add them directly.
This guide explains how to manually assign a user to a book campaign.
Prerequisite: The User Must Have an Account
Before you can add someone, they must be a registered user on your WordPress site.
- If they already have an account (e.g., “Subscriber” role), you are good to go.
- If not, go to Users > Add New in WordPress and create a simple account for them with their email address first.
Step 1: Navigate to the Applicants Page
- Log in to your WordPress Admin Dashboard.
- Go to ARC Campaigns > Applicants.
Step 2: Locate the “Manually Add Reviewer” Form
At the very top of the Applicants page (above the list of names), you will see a box titled “Manually Add Reviewer”.
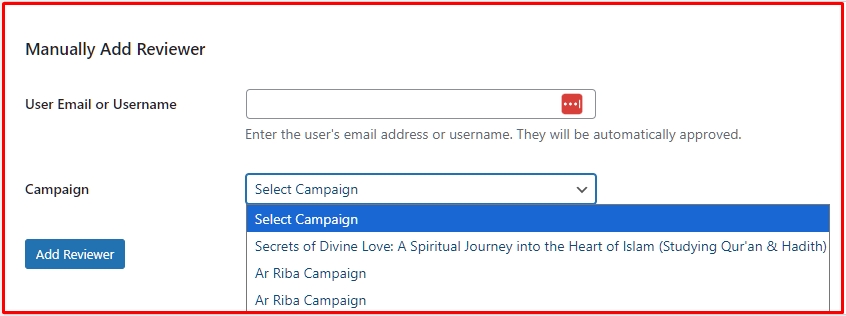
Step 3: Enter User Details
- User Email or Username: Type the email address or username of the person you want to add. (Remember, this must match their WordPress user account).
- Select Campaign: Choose the specific book campaign you want to give them access to.
- Note: If you filtered the page by a specific campaign earlier, this dropdown might be hidden as the system already knows which campaign you are working on.
Step 4: Click “Add Reviewer”
Click the Add Reviewer button.
What happens instantly?
- Auto-Approval: The system adds them to the campaign and immediately sets their status to “Approved”. You do not need to approve them manually.
- Notification: The user receives the standard “Welcome Email” containing the link to their dashboard so they can download the book immediately.
Why use this feature?
- Beta Readers: Quickly add your inner circle before opening the campaign to the public.
- Troubleshooting: If a user says they can’t figure out the application form, you can do it for them.
- VIP Access: Give a specific influencer access without asking them to “apply” like everyone else.
Next Tutorial: [Exporting Your Reviewer Data to CSV]